How to create your business page and start selling through Facebook
Two-thirds of Facebook users claim to visit a local business’ Facebook Page at least once a week. By now, it should be a no-brainer that mastering Facebook marketing is a must for a brand that hopes to success. This is especially true now given the world’s current circumstances in regards to COVID-19. Within the first quarter of 2020, there has been over 2.6 billion monthly active users on Facebook.
Potential customers are actively seeking out businesses like you on online platforms, particularly Facebook. A clear and focused marketing strategy is the only way to tap into this already existing audience. As Facebook puts it, your Business Page is “an online corner store of your brand.”
The best part about this is that it doesn’t cost anything to set up a Facebook Page! Not only can you reach this audience, but once you’ve created your page you can also use it to post timely updates, share your website link and
communicate with potential leads and followers directly. Additionally, Facebook advertising is relatively inexpensive and compared to traditional print, radio or television ads it can be 1,000X less expensive.
Creating a Facebook Business Page doesn’t have to be a difficult or daunting task. You most likely already have all of the images, text and ideas needed to build up your page. All you need to do is sit down and work through a few easy to follow steps that we are going to walk you through today. Soon, you will have your page up and running!
How to Create your Facebook Business Page

When you are ready to begin creating your page, visit: facebook.com/pages/create. You will need to be logged into your personal Facebook account in order to get started. Don’t worry, none of your personal information or content will appear on your new page!
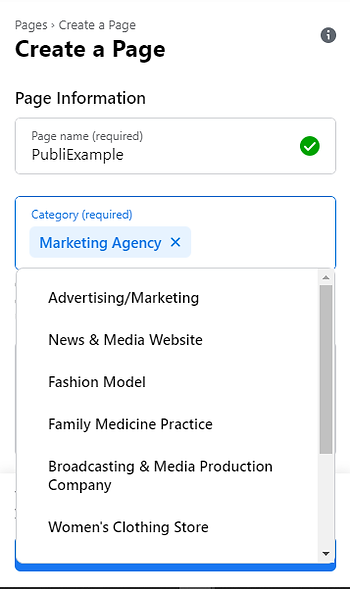

Select your page type; business/brand or community/public figure. You will then enter all of your business’ details. You are allowed to input up to three categories and this can be edited later if need be. When describing your business, you really want to come up with a short and catchy message that will describe your products and or services. Profile and Cover Image
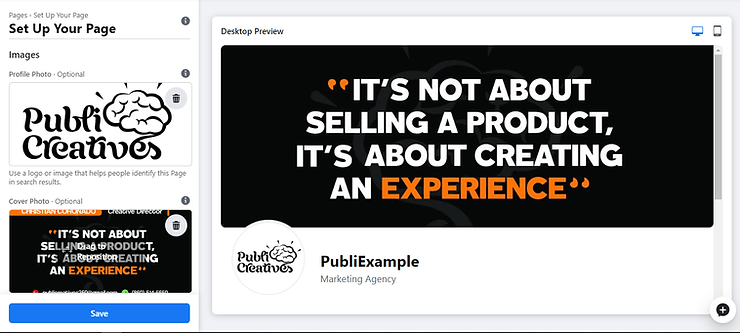
Once you have completed the first steps of creating your Facebook Business Page, you will then need to upload a profile/default and cover image. Always remember that first impressions count, so choose carefully what you would like your audience to see when they first find your page. Be sure that your photos align with your brand, are high-quality and easily recognizable.
To build and increase brand recognition, utilizing your logo would be the best option. If you have a signature offer, try using a well-shot image of your offer. If you are a public figure such as
an influencer or celebrity, then choosing an image of yourself will work like a charm. The important thing here is to help people instantly recognize and feel attracted to your page.
Cover images are excellent for showcasing your work, announcing promotions or important updates. You can think about this image as a direct call to action. It is important to note that cover images are not mobile optimized. Double-check your cover photo to ensure important parts are not cut off on mobile.
Once you’ve selected the perfect image to represent your brand, select ‘Save.’ Now that you have officially created you page, let’s head over to the ‘Edit Page Info’ tab. Username
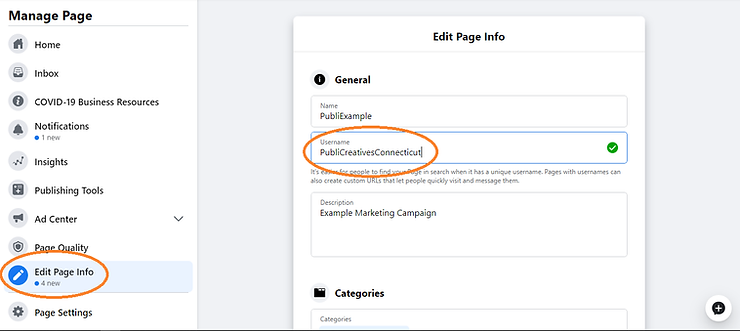
Your username will be how you are going to tell your customers how to find you online. Generally, you would want to keep your username short so that it is easy to remember and type out. A good practice would be to utilize this username across all platforms; Instagram, Twitter, etc. If the name of your brand or business is taken, try putting your location next to the name. Example: PublicCreativesConnecticut
Contact Information
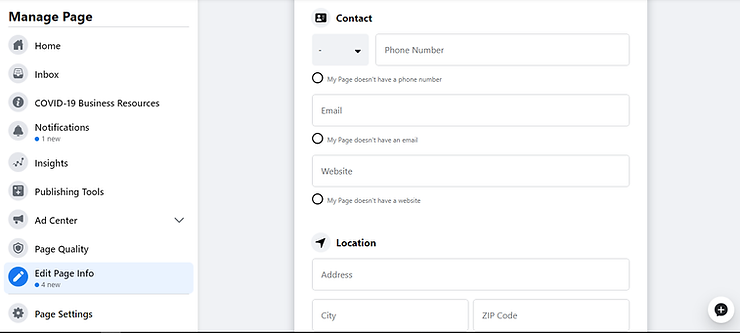
After you have selected a username that fits, scroll down and you will see the ‘Contact and Locations’ section. Here you will input all of the information necessary for potential customers to easily reach out to you. Include your phone number, website link, email, location and hours. The main point of creating a social media page is to reel in your audience and bring them to your front store or website, converting your traffic into leads. If you do not have a website or storefront just yet, you can still communicate with your audience through Messenger and you can even sell products directly from Facebook as well.
Setting up your Services Tab and E-commerce store
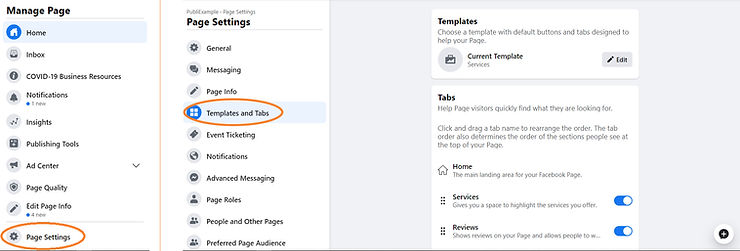
After completing the most basic steps of your Facebook Business Page, you should list your services and products for potential customers to see. To add services or products you must first add the ‘Services’ and ‘Store’ tab…
-
Select ‘Settings’ on the top right of your Facebook Business Page
-
Click ‘Templates and Tabs’ on the left menu
-
Click on ‘Add Tab’ and select the additional tabs you need
You could also choose to pick a template at the top of the page. These are pre-designed with tabs. Just select ‘Edit’ and pick out which template would fit best with your Business Page.
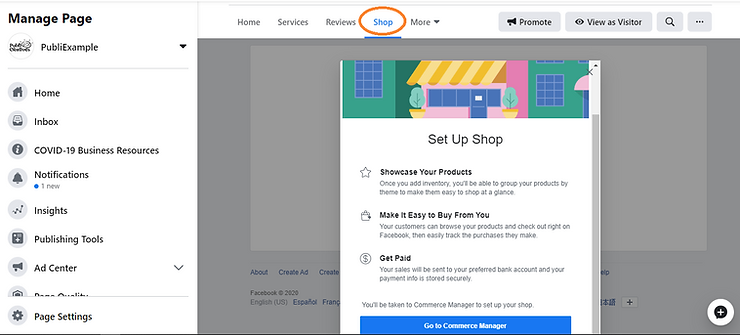
After working on your services, go back to your main page and click on Shop and go to Commerce Manager. Here you will put all of the information required; shipping, return policy, customer service, business date (sole proprietorship, non-profit or LLC), and link your bank account.
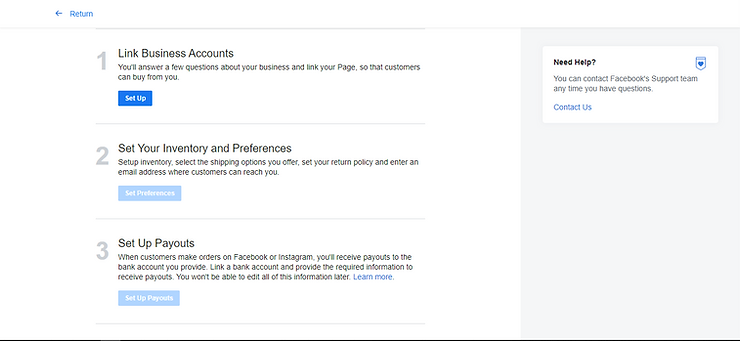
Once this has been completed, you can begin uploading your products to your Facebook page.

If you want to take the next step and start creating a website but are not sure where to begin, visit our PubliBlog Get your business online! Basics of creating your Webpage . There I explain the key differences between Wix and Shopify.
Now that you have completed your new Facebook Business Page, you can begin creating posts, automatic messages for users to see when they contact you and more. You can even connect your Instagram page to Facebook!
We hope that you enjoyed the blog and found it to be helpful. If you have any questions, please let us know below in the comments. Follow us for our next blog where we will be covering how to create your Instagram page and convert it into a business profile.